
It takes one second to press the “launch” button. Millions more go into fine-tuning all the tumblers before and after. This piece by Kateryna Novatska tells how never to regret launching a campaign and never drain your media buying budgets away.
Programmatic display CPMs may be cents, but they bring few clicks and often zero conversions. Unfortunately, industry expectations don’t seem to match this scenario. According to the Epom client survey, 71% of programmatic agencies prioritize performance over reach.
Are demand-side platforms to blame for underperforming traffic? Don’t rush the verdict since the issue lies under the hood of the campaign itself. Instead of buying traffic resold by intermediaries at subpar CPA or CPC rates, agency-employed media buyers can tweak their CTR and conversion rates directly in the platform.
Switch the Bidding Model to CPC
RTB auctions are initially based on CPM pricing. Supply-side platforms, like those that sell native traffic, might also take payments per click. Likewise, demand-side platforms add CPC bidding as an option. It’s the most obvious tweak to increase performance: paying by click guarantees website visits.
Supply-side platforms that don’t sell traffic via CPC will still have to convert prices into CPM, causing budget leaks and discrepancies. Thus, a media buyer needs to know that both sides have the same settings.
Even if your self-serve platform supports CPC, you might not know which traffic is CPC. Consequently, you bid by CPM but pay the converted CPC – which can hurt your budget if the traffic delivers low performance by default.
Getting proprietary technology that supports CPC bidding and lets you connect other traffic sources is smart if you plan to pay by click for your display ads. A digital agency can either buy the platform from scratch (not recommended) or white-label it.
The latter option saves money on development but allows setting up custom SSP endpoints for a relatively low monthly fee. Therefore, media buyers buy traffic from the partners they pick, not the ones offered by the providers’ ad exchange.
Blacklist Underperforming Traffic Sources
The simplest way to increase the traffic quality is not to jump between several DSPs looking for the perfect match but to weed out the bad traffic from the campaigns you already have. Here auto optimization comes to the rescue.
Disclaimer: optimization options may vary on different DSPs. However, advanced platforms incorporate flexible auto-optimization algorithms which you can fine-tune according to your needs. In Epom DSP, we call them Bidding Rules. Let’s take a closer look at how they work.

Alt: Example of a bidding rule in Epom DSP.
For example, your client wants a 10% CTR on their ads. Creating a filter to leave only traffic that performs higher than 10% will help here.
You go to your optimization settings and set the condition to add low-performing traffic sources into a separate list. If impressions are more than 100 and CTR is less than 10%, the source will be automatically “blacklisted.”
Let the testing campaign run for several hours so that the platform will gather enough data about your traffic. Then, return to the campaign settings and tweak your targeting to exclude this list. When the rule starts working, you’ll no longer buy inventory from sites or apps where people don’t engage with your ads.
Multiply Bids for the Traffic with a High Conversion Rate
Clients of performance-based agencies demand high conversion rates on their ads and pay high CPAs reluctantly. Although with little effort, media buyers can provide them with a lower CTA while still bidding by CPM.
In the same way as the previous example, you can automatically change your bid for specific sources based on your KPIs and juggle your CTA to fit your client’s budget. Let’s see how.
In Epom DSP, we call this optimization the Bidding Multiplier. Based on how their audience interacts with your landing page, you can increase or decrease bids with its help. For example, you can create a separate list of websites or bundles that deliver leads for less than $5 each.
Later in the Bidding Rules, you use “if/then” logic and define a rule in the following way: if a campaign gets one or more conversions on a site, and the CPA is less than $5, then Bidding Multiplier will increase bids on this site by 20%.
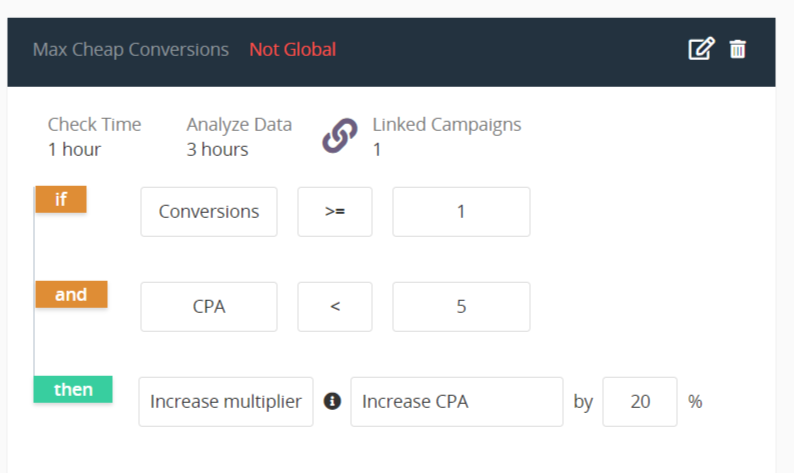
There’s a widespread concern here: why do we get a lower CPA if we increase the bid by 20%? By using a multiplier, you increase the bid only to win a quality impression, but you only pay 1 cent more than the 2nd highest bidder.
After enabling this rule, you’ll bid higher on the inventory from cost-effective sources. As a result, your budget will be used more efficiently. Wasn’t that your goal?
Collect Bidstream Data and Contextual Data
Besides segments derived from data management platforms and used for behavioral targeting, you can collect valuable data points directly via a demand-side platform. Two of the types we will discuss today are bidstream and contextual data.
Bidstream is the data forwarded from the publisher to the advertiser’s DSP. Most SSPs enable transmission of non-PII data like location, inventory specs, and device properties since this information doesn’t require gathering user consent.
Contextual data is often collected without user permission as well. It’s related to the content on the page rather than user behavior and usually represents the page’s category.
Both types of data are immune to the upcoming 3rd-party cookie phase-out and don’t require you any additional tools for their collection. In Epom DSP, for example, you can request bidstream data export, process it with a business intelligence tool, and then build custom user segments for your audience.
It’s even more straightforward with contextual data: you enable a website or page category as your custom targeting parameter — in Epom DSP, it’s called an Extension Filter — and start targeting audience by categories. The only tricky part is ensuring that your chosen SSPs forward category data to the DSP.

Alt: Contextual targeting implementation
Enriching your targeting data with bidstream and contextual, you buy more relevant impressions and get more clicks and conversions on your ad.
Utilize Advanced Geo-Location Targeting
Using location-based targeting is another way to get hyper-relevant. In addition to targeting by country or city, there’s geofencing. This tool allows you to reach users within a 100-meter radius of the desired location.
This could be your ace up your sleeves if you’re in an agency that works with local brands. Moreover, geofencing lets you target several spots simultaneously to cover all your competitors.
Combining geofencing with branded campaigns is also effective. Firstly, you run simple awareness campaigns, add these people to the list, and retarget them while they’re in a specific place.
How to Pick the Right DSP to Perform All These Actions?
It’s a good question! We based all tips on our white-label DSP but wanted to give some unbiased advice on how performance-based agencies can pick the right tool. Here they are:
- A white-label option would be better than any self-serve because it allows the agency to re-brand the platform, offer self-serve RTB as a client service, export bidstream, and have complete control over the connected traffic sources.
- Platforms should have transparent optimization rules that media buyers can customize.
- When you’re setting up a white-label DSP for the first time, it might be a bit daunting. Ensure the platform’s provider has a proven record of quality customer support.
- If you want to implement all five tips, ask about CPC bidding, geofencing, and contextual targeting during a demo call.
To thank you for reading our article, we offer an extended trial for Epom DSP. You can test the platform for one month and learn if the tips above work for you.